1 - Getting Started Guide
The My Data Diary+ tool is designed to store important data and documents. As you enter information in the tool, you will encounter buttons that allow you to add documents that are related to the information that you are entering. You can add multiple documents in any section and will have the ability to print and view them when you return to the section or create a custom report.
Document buttons designated with a red exclamation point signal that the specified document(s) will likely be needed in the future to manage personal business or transactions. It is highly recommended that you upload the documents identified with a red exclamation point into the tool for easy access when needed in the future.
To upload a document into the database, temporarily move the document into the “MDD Document Transfer” folder on the My Data Diary+ USB storage device. Upload documents into the tool by clicking on the document buttons and following the prompts to select the document(s) that you have moved into the “MDD Document Transfer” folder. Name the uploaded file something that will help you easily identify it later.
Once a document has been added to the database, it is encrypted and can only be accessed after you have opened the tool and entered your password or recovery questions. For your protection, all documents in the temporary “MDD Document Transfer” folder are deleted when you close the tool.
Archive Individual Records
Individual records can be “Archived” by selecting the red “Archive” option on the right corner of the record or document. When you click “Archive” you will be asked to confirm your desire to archive the record or document.
Archive a Profile
You can archive an entire profile by going to Profile Management in the Administration section. Select the red “Archive” option on the right corner of the record. When you click “Archive” you will be asked to confirm your desire to archive the record.
View Archived Record(s) and/or Profile(s)
You can view archived records or profiles as follows:
- Go to the Settings page of the Administration section.
- Select “Yes” in the “Show Archived” field.
- Navigate to a specific page to view archived records or go to Profile Management in the Administration section to view archived profiles.
Restore or Discard an Archived Record
When you have enabled the “Show Archived” setting on the Settings page of the Administration section, you will be given the option to “Restore” or “Discard” records that have previously been archived. If you click “Restore”, it will return the record to a standard viewing status. If you click “Discard”, you will be asked to confirm your desire to permanently hide the record.
IMPORTANT NOTE: Once you have discarded a record you will NOT be able to restore the record into your active database. Portions of the records may remain accessible by the database to ensure that the links in your tool remain intact.
Restore or Discard an Archived Profile
Enable the “Show Archived” setting in the Settings page of the Administration section. Return to the Profile Management page in the Administration section of the tool where you will now see the profiles that you have previously archived. You will see options to “Restore” or “Discard” the record. Click “Restore” to return the profile to active status. Click “Discard” to permanently hide the profile.
IMPORTANT NOTE: Once you have discarded a profile you will NOT be able to restore it into your active database. Portions of the profile may remain accessible by the database to ensure that the links in your tool remain intact.
Deleting Documents
You can delete documents from your database at any time by selecting “Delete” in the document viewer window. You will be asked to confirm the action because documents deleted from the database are permanently deleted.
The standard Windows close “x” in the upper right corner of your screen is disabled to enable the auto-save capability in the tool. To close the tool, use the large “X” next to the Key Word Search in the top right corner of your tool. Clicking this large “X” inside the tool will ensure that all of your database changes have been saved.
It is recommended that you safely “Eject” your My Data Diary+ USB drive from your computer using the standard method for your computer. For Windows PCs, there are several methods available for you to safely remove your device:
- Right-click on the My Data Diary+ device in the File Explorer window and select “Eject” or
- Click on the USB icon in the lower right corner of your computer and Click on “Safely Remove Hardware and Eject Media”.
We recommend that you use the USB device that you have been provided as your master database so that you can update your tool whenever and wherever you are. However, as with all digital files, you will want to keep a backup copy of the tool and/or database in another secure electronic location (such as a desktop computer or another mobile device).
There are three options available for you to back up your files.
- Click on the Database Backup page in the Printing & Sharing section of the tool.
- Use the “Create a Full Database & Recovery File” option to create a fill backup of your database and password recovery files. Specify a personal file name for your backup database and password recovery files.
- Use the “Create Read-Only Database” option to create an un-editable copy of your database to share with your care companions. Specify a personal file name for your backup database. Specify a password for this read-only copy.
- Only use the “Create Backup for MDD Support” option at the direction of a member of the MDD support team.
- You can create a backup copy of your database file by copying both the “mydatadiary” and “mydatadiaryRecovery” files from the Data folder on your USB storage device to a secure location on another computer or storage device. Using this method, you will not be able to open these files without first copying them to the Data folder on a device loaded with the My Data Diary+ software.
- To create a full backup of your My Data Diary+ software and database, you can copy the entire contents of your My Data Diary+ USB device to a folder on another computer or storage device. (This may take up to 60 minutes.) You can open your database from this backup location the same way you open the database on the USB drive. It is recommended that you include the word “Backup” and the date of the backup copy in the name of the folder so that you don’t accidentally update this backup copy instead of the primary version of the tool where updates should be made.
Create a profile for each member of your household by entering the requested information. You are able to add new profiles or modify existing profiles at any time by returning to the Profile Management page in the Administration section of the tool.
You will need to designate one person as the tool Administrator in order to establish relationships with other members of your household. Any profile can be set as the tool Administrator. The Administrator is usually either the head of the household or the person who will be primarily responsible for data entry and data management in the tool. There can only be one designated Administrator of the tool, but anyone who uses the password to access the tool will be able to add, update, or change the information in the tool.
To change the Administrator of the tool, first change the Administrator status of the current Administrator to “No”, and then change the Administrator status of the new Administrator to “Yes”. Be sure to update the “Relationship to Administrator” status on the Profile page of the Personal Information section for each profile to reflect the correct relationship to the new administrator.
Before you create a custom field, you will want to ensure that the field you are creating is not already included somewhere else in the tool by using the “Field Name Search” capability described in the “Finding Information in the Tool” section.
If you determine that you need a data field that is not included in the tool, you can create a custom field. To enable the custom field capability:
- Enter key search words in the “Field Name Search” function to ensure that the field you are wanting to create is not already included somewhere else in the tool.
- Go to the Settings page in the Administration section and set the “Show Custom Data” field to “Yes”.
- Return to the page where you want to enter the custom data and Scroll to the bottom of the record where the “Custom Data” section will now be visible.
- Click on “Add or search for a record”.
- Click “Add New”.
- Enter data for the “Custom Field Name” and “Value”.
The custom field you create is only added to that specific page / record.
To add a document to the database, you first need to convert it into a digital format. There are several methods you can use to create a digital file of your paper documents:
- Use your printer to scan the document and save it the MDD Document Transfer Folder on your My Data Diary+ tool.
- Take a picture of the document with your phone and email it to yourself. Save the document to the MDD Document Transfer Folder on your My Data Diary+ tool. (This method is only recommended for single page documents.)
- Take a picture of the document with the camera on your computer. Move the documents to the MDD Document Transfer Folder on your My Data Diary+ tool. (This method is only recommended for single page documents.)
- Use a free scanning app such as GeniusScan on your phone to turn a multi-page document into a PDF file and e-mail it to yourself. Save the document in the MDD Document Transfer Folder on your My Data Diary+ tool.
If the document you are scanning is highly sensitive or confidential, we recommend using a local scanner connected to your computer so you can avoid transmitting information over the internet.
Note: The “MDD Document Transfer” on your My Data Diary+ USB device is NOT secure or encrypted. For your protection, all documents in the “MDD Document Transfer” folder are deleted when you close the tool.
You can print any page of the tool by clicking on the Printer icon in the upper right corner of the tool.
- To print a physical copy of the page, select the printer you want to use and click print.
- To create an electronic copy of the page that you can attach to an e-mail or save to another location on your computer, select a print to PDF option such as “Microsoft Print to PDF” and follow the prompts to save an electronic copy of that file to the location of your choice. Please remember that the PDF output files you create are not encrypted or protected in any way. It is not recommended to send unprotected files by standard email if they contain any information that you wish to keep confidential or secure.
The My Data Diary+ custom reporting page provides you with the ultimate flexibility to select the content you want to print and / or share with your care companions:
- Go to the Printing & Sharing in the left navigation bar.
- Select Custom Reports.
- Select the Profile (person) for which you wish to create the report.
- Select one or more sections you want to include in your report.
- Customize your output:
- By default, only the fields you have populated will show on the report. To show blank fields for the sections you have selected, click on the “Show Blank Fields” button.
- By default, the report will not show fields designated as “sensitive data” (i.e. Social Security number). To show sensitive data, click the “Show sensitive data” button.
- By default, documents are not included in the report. To show documents that have been uploaded in the sections you have selected, click on the “Show documents” button.
- Click on the printer icon in the upper right corner of the tool.
- To print a physical copy of the report you have created, select the printer you want to use and click print.
- To create an electronic copy of the output report that you can attach to an e-mail or save to another location on your computer, select a print to PDF option such as “Microsoft Print to PDF” and follow the prompts to save an electronic copy of that file to the location of your choice. Please remember that the PDF output files you create are not encrypted or protected in any way. It is not recommended to send unprotected files by standard email if they contain any information that you wish to keep confidential or secure.
With the My Data Diary+ tool, you can have all of your important documents with you at all times. Once you have saved a document into your database, it is easy to download it from the database whenever you might need it.
- Find the document you need in the tool.
- Click Download.
- Watch for the “Success” message in the green box in the upper right corner of the tool.
- Go to the MDD Document Transfer Folder on your My Data Diary+ tool to find the downloaded document that you need.
- Print the document or save / move the downloaded document to another location on your computer.
Note: The Document Transfer Folder on your My Data Diary+ USB device is a temporary folder because is NOT secure or encrypted. It is recommended that you delete documents from that folder immediately after transfer. For your protection, all documents in the “MDD Document Transfer” folder are deleted when you close the tool.
You can search for a field name by clicking on “Field Name Search” in the top right corner of the tool and entering key words. The results areas will display the path to any page in the tool that contains the search term that you entered.
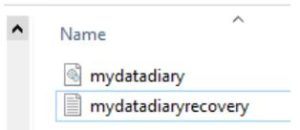
If you have purchased more than one My Data Diary+ tool for different family members or households, you can store, manage, and / or view databases for multiple households on the same My Data Diary+ device. To manage multiple databases on the same device, you will need to customize the names of the files stored in the Data folder on your My Data Diary+ devices. The standard naming for the files in the Data folder is displayed below:
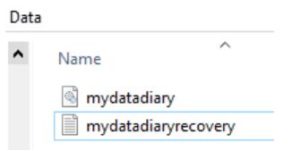
Customize the names of the two files in the Data folder in each device by adding a value at the beginning of each file that is exactly the same for both files as indicated below. Be sure to use different custom names for the two different data sets.
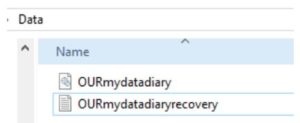
Copy the two renamed files from the Data folder on your second device into the Data folder on your first device (and vice versa if you like).

You may want to include the word “Copy” or “Backup” in the name of the database that has been copied for reference only and is not intended to be used for primary data entry and content management.
When you have more than one database and recovery file saved in your Data Folder, the tool will prompt you to select the database you want to access when you launch the software:

To open a specific database, select the Database you want to view, enter the password for that database, and click “Login”.
Your My Data Diary+ tool can be opened by both Windows and Mac operating systems. The tool is compatible with the below Windows and Mac versions. A ‘+’ indicates the minimum supported version.

Anti-virus software installed on your computer might interfere with the installation of the My Data Diary+ software. To successfully load the software, you may need to disable your virus protection program or mark the software as safe. If your virus protection program quarantines or disables the My Data Diary+ software, you will need to contact the My Data Diary team for support at support@mycarecompanions.com.
The My Data Diary+ family information and personal productivity tool allows you to capture and manage all of the persona, household, health, financial and legal information that you will need to manage your family’s affairs through your lifetimes. The amount of time you will need to populate the tool will depend on the complexity of your personal situation and the volume of your personal information.
You should plan to update your tool whenever there is a change or addition to your information. We recommend that you formally update and review all of your information at least once a year with your care companions (your trusted family members, friends, and professionals who may be called on to help you or a family member manage personal affairs) so they will have all of the information they will need.
The My Data Diary+ tool is designed to be a self-contained, mobile, secure solution that you can have with you at all times. It will open on any Windows or Mac devices that meet the minimum operating system requirements.
The My Data Diary+ tool automatically saves your information each time you change pages and when you close the tool.
Your My Data Diary+ tool arrives with “Password” set as the factory password. You will be prompted to create a personal password as part of the My Data Diary+ set-up process. You should create a personal password that is difficult to guess but easy for you and your care companions to remember. You can modify your password and security questions at any time on the Security page of the Administration section of the tool.
The My Data Diary+ tool is stand-alone software with no links to external servers or systems. If you lose or forget your password, it is not possible for anyone but you to recover access to your database. Therefore, we recommend that you carefully select all three recovery questions and answers. Answers to the recovery questions are case sensitive. To access the tool without the password, you will need to answer all three questions correctly. Once you have gained access to the tool using your personal recovery questions, you will be able to reset the password.
Please remember that you are responsible for the security of all information and stored on the My Data Diary+ tool. My Data Diary, LLC accepts no responsibility for lost or stolen data.
Updating your My Data Diary+ tool will allow you to benefit from new features and bug fixes that are released in the future without losing the information and documents you have entered into your database. The standard update process can be found in the License Management page of the Administration section.
NOTE: The upgrade process only retrieves data from My Data Diary web servers. It will not upload your data to the internet.
Follow the below instructions to update your version:
- Click on Administration.
- Click on License Management.
- Click the “Check Latest Version” button.
- If there is a new version available:
- To upgrade the Windows version, click on “Upgrade to latest Windows version” button. To upgrade the Mac version, click on “Upgrade to latest Mac version” button. (Only one upgrade can be in progress at a time.)
- You will be prompted to select a location to create a backup of your database. This location should be a location on your computer somewhere other than your My Data Diary+ USB drive. New versions will make changes to the software but should not change any of your existing data (unless otherwise noted in the release notes on our website).
- The upgrade process will begin and its progress will be shown. This process could take up to 60 minutes.
- If the “Latest Version” matches the current version of your software, no upgrade buttons will appear.
If you have received a Specialty version of the My Data Diary+ tool from a professional advisor or service provider, you can upgrade to the Premium version of the My Data Diary+ tool to enable all of the content and capabilities available in the Premium version of the tool. Go to https://mydatadiary.com/. Purchase the upgrade you desire. Following your upgrade purchase, you will receive a software “Key” by email that you can use to access the Premium version of the My Data Diary+ tool. Return to the License Management page of the Administration section of your My Data Diary+ tool. Click on the “Add License” button in the “Licenses” section of the page and enter the software key that was emailed to you at the email address you provided when you purchased the upgrade to the Premium version.
2 - Frequently Asked Questions
How do I archive a record that I might want to access again in the future?
Individual records can be “Archived” by selecting the red “Archive” option on the right corner of the record or document. When you click “Archive” you will be asked to confirm your desire to archive the record or document.
How do I archive a profile that I might want to view again in the future?
You can archive an entire profile by going to Profile Management in the Administration section. Select the red “Archive” option on the right corner of the record. When you click “Archive” you will be asked to confirm your desire to archive the record.
How do I view previously archived records and / or profiles?
You can view archived records or profiles as follows:
- Go to the Settings page of the Administration section.
- Select “Yes” in the “Show Archived” field.
- Navigate to a specific page to view archived records or go to Profile Management in the Administration section to view archived profiles.
How do I restore an archived record?
When you have enabled the “Show Archived” setting on the Settings page of the Administration section, you will be given the option to “Restore” or “Discard” records that have previously been archived. If you click “Restore”, it will return the record to a standard viewing status.
How do I discard an archived record?
When you have enabled the “Show Archived” setting on the Settings page of the Administration section, you will be given the option to “Restore” or “Discard” records that have previously been archived. If you click “Discard”, you will be asked to confirm your desire to permanently hide the record.
IMPORTANT NOTE: Once you have discarded a record you will NOT be able to restore the record into your active database. Portions of the records may remain accessible by the database to ensure that the links in your tool remain intact.
How do I restore an archived profile?
Enable the “Show Archived” setting in the Settings page of the Administration section. Return to the Profile Management page in the Administration section of the tool where you should now see the profiles that you have previously archived. You will see the option to “Restore” or “Discard” the profile. Click “Restore” to return the profile to active status.
How do I discard an archived profile?
Enable the “Show Archived” setting in the Settings page of the Administration section. Return to the Profile Management page in the Administration section of the tool where you will see the profiles that you have previously archived. You will see options to “Restore” or “Discard” the record. Click “Discard” to permanently hide the profile.
IMPORTANT NOTE: Once you have discarded a profile you will not be able to restore the profile into your active database. Portions of the profile may remain accessible to the database to ensure that the links in your tool remain intact.
Should I make a backup copy of my tool?
We recommend that you create a backup copy of your My Data Diary+® database in a secure electronic location that is separate from your primary storage location. This can be a separate hard drive, an external storage device such as a USB drive, or a secure web storage location of your choosing.
How do I make a backup copy of my tool?
Each time you close the My Data Diary+® solution, you will be prompted to create a backup. If you want to create a backup while you are using the solution, click on the Database Backup page in the Settings section of the tool.
-
- Use the “Create a Full Database & Recovery File” option to create a fill backup of your database and password recovery files. Specify a personal file name for your backup database and password recovery files.
- Use the “Create Read-Only Database” option to create an un-editable copy of your database to share with your care companions. Specify a personal file name for your backup database. Specify a password for this read-only copy.
- Only use the “Create Backup for MDD Support” option at the direction of a member of the MDD support team.
Can I manage more than one database on the same My Data Diary+ USB drive?
If you have purchased more than one My Data Diary+ tool for different family members or households, you can store, manage, and / or view databases for multiple households on the same My Data Diary+ device. To manage multiple databases on the same device, you will need to customize the names of the two files stored in the Data folder on your My Data Diary+ devices. The standard naming for the files in the Data folder is displayed below.
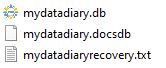
Customize the names of the three files by adding a value at the beginning of each file that is exactly the same for both files as indicated below. Be sure to use different custom names for the two different data sets.

Copy the three files from the Data folder on your second device into the Data folder on your first device (and vice versa if you like).

You may want to include the word “Copy” or “Backup” in the name of the database that has been copied for reference only and is not intended to be used for primary data entry and content management. When you have more than one database saved and accessible, the tool will allow you to select the database you want to access when you launch the software. To open a specific database, select the Database you want to view, enter the password for that database, and click “Login”.
How do I update my My Data Diary+ Software?
Updating your My Data Diary+ tool will allow you to benefit from new features and bug fixes that are released in the future without losing the information and documents you have entered into your database. The standard update process can be found in the License Management page of the Administration section.
NOTE: The upgrade process only retrieves data from the My Data Diary web servers. It will not upload your data to the internet.
Follow the below instructions to update your version:
- Click on Administration.
- Click on License Management.
- Click the “Check Latest Version” button
- If there is a new version available:
- To upgrade the Windows version, click on “Upgrade to latest Windows version” button. To upgrade the Mac version, click on “Upgrade to latest Mac version” button. (Only one upgrade can be in progress at a time.)
- You will be prompted to select a location to create a backup of your database. This location should be a location on your computer somewhere other than your My Data Diary+ USB drive. New versions will make changes to the software but should not change any of your existing data (unless otherwise noted in the release notes on our website).
- The upgrade process will begin and its progress will be shown. The upgrade could take as long as 60 minutes.
- If the “Latest Version” matches the current version of your software, no upgrade buttons will appear.
Can I combine data from separate My Data Diary+ tools into one database / tool?
This feature is not available at this time.
Can I export a portion of the data from my My Data Diary+ tool into another copy of the tool for independent use?
This feature is not available at this time.
Can I safely store my COVID-19 Vaccination Record Card?
You can create a COVID-19 Vaccination Record Card for each member of your family on the Immunizations page of the Health section of the My Data Diary+ tool. You can capture all of the information about your COVID-10 immunization and upload a copy of your Vaccination Record Card for safekeeping. The digital copy of your COVID-19 Vaccination Record Card will be stored on your device and in your backup copies of the tool.
Your vaccination information is accessible to you at all times from your saved database that you access on any Windows or Mac computer with a compatible version of the operating system (see below).
The date field requires an exact date, and I don’t know the exact date of an event?
The tool will require dates in MM/DD/YYYY format to save the information. If you don’t know or remember an exact date, you should estimate the Month, Day or Year as needed and make a note in the record that the date is an estimate only.
Should I enter a Personal Contact for the individuals who have profiles in my tool?
We recommend that you create a Personal Contact record for each member of your household even though you have already entered some of their information in the profile section. This will allow you to print their contact information in your contact list and link to their personal information in other sections of the tool.
Why am I asked to link individual members of my household to each vendor, contact, etc., and what is the best way to use this feature?
This feature has many benefits. It allows you to:
- Enter information once and associate that information to one or more members of your household.
- Designate which member of your household is authorized to transact or interact with a particular vendor, asset, or liability.
It is recommended that you designate / select the individual(s) who are authorized to transact business with an account or vendor or who have the legal responsibility for a particular asset or liability. If, for example, your cell phone account is in only one person’s name, you would only select that person as the individual authorized to transact business on that account.
What is the difference between a Service Provider and Vendor and when should I use each one?
A Service Provider is a person and a Vendor is a business. You may have many service providers associated with one vendor, but generally, you will only have one vendor associated with an individual service provider. An example of this relationship is that you might have many individual doctors (service providers) associated with one health system (vendor).
Establishing this relationship will allow you to see all Service Providers who are affiliated with the same vendor and will allow you to enter the vendor detail only once. If your Service Provider works for him / herself, it is not necessary to enter Vendor information for that Service Provider.
Do I need to enter all of the fields for every vendor / provider? What if I don’t know their address or never use their website?
The tool is designed to be able to capture all of the information that you might need / use, but it is only recommended to enter information that you will actually use. For example, if you never use or need the address for a vendor because all transactions are handled over the internet, there is no need to enter a physical address for that vendor.
Why are vendors from one section showing up in a search for another section?
Because some vendors cross-sections of the tool, they might be listed and/or appear in searches in multiple sections of the tool. Also, if you have designated their “Service Type” as “Other”, they will likely appear in multiple searches.
Where do I record codes to unlock my phone, PC, car, etc.
We recommend creating a record on the Websites & Passwords page of the Household section to capture this information.
What do I do if I can’t find a field that I need?
It is possible to create a custom field on any page of the tool. Before you create a custom field, you will want to ensure that the field you are creating is not already included somewhere else in the tool by entering key search words in the “Field Name Search” function in the upper right corner of the tool.
If you don’t find the field that you need using the “Field Name Search”, you might also consider if the information you want to capture can be entered in an “Other Notes” section on a related record. If that is not adequate for your needs, you can create a custom field on any page of the tool.
How do I create a custom field?
You can create a custom field on any page of the tool with the following steps:
- Go to the Settings page in the Administration section and set the “Show Custom Data” field to “Yes”.
- Return to the page where you want to enter the custom data and Scroll to the bottom of the record where the “Custom Data” section will now be visible.
- Click on “Add or search for a record”.
- Click “Add New”.
- Enter data for the “Custom Field Name” and “Value”.
The custom field you create is only added to that specific page and record.
How does the program know when a section is complete?
The Section status is changed by the user because only you will know when you have entered all of the information that applies to your household in that section. Please note that the section status applies to all profiles and information in that section and can up updated either on the Table of Contents or on the top of each individual page of the tool.
How do I delete a blank record that I created on accident?
If you accidentally create a record, you can archive the record and then discard it by following the steps in the “Archiving and Discarding Records and Profiles” section below.
Can I upload data that I have stored in an Excel spreadsheet instead of entering it through the My Data Diary+ application?
This feature is currently available for uploading information into the Websites & Passwords page in the Household section of the tool only.
- Go to the External Transfer page of the Printing & Sharing section of the tool. Select “Import From”. Select “Websites & Passwords”. Click “Download Example File”.
- Go to the MDD Document Transfer folder on your My Data Diary USB drive. Open the “WebsitesAndPasswords_ExampleFile”. Enter your personal website and password information into the spreadsheet using one line per record. Save the file with your personal website and password information to a location on your computer and to the MDD Document Transfer folder.
- Return to the External Transfer page of the Printing & Sharing section of the tool. Select “Import From”. Select “Websites & Passwords”. Click the “Select Document to Import” button. Navigate to the MDD Document Transfer folder and select the file you created. Click Open.
Can I export data from the My Data Diary+ tool into another application?
This feature is only available for select use by Affiliate partners. This feature is not yet available for general use.
How often should I update my information?
You should update the information in your My Data Diary+ tool anytime there is a material change to your information. We recommend opening and updating the tool at the time you become aware of a change, but we recognize that may not always be practical or possible.
We recommend that you update and re-share your information with your care companions at least once a year. A great time to do this is right after you file your taxes when you have all of your personal and financial information readily available.
How should I keep track of items that need to be updated in the tool?
If you need to change something in the tool but don’t have time to make the change right now, you can change the section status to “Needs Update” and add a note for yourself next to the Section Status on the Table of Contents Page.
How do I create a digital version of a paper document?
There are several methods you can use to create a digital file of your paper documents:
- Use your printer to scan the document and save it the MDD Document Transfer Folder on your My Data Diary+ tool.
- Take a picture of the document with your phone and email it to yourself. Save the document to the MDD Document Transfer Folder on your My Data Diary+ tool. (This method is only recommended for single page documents.)
- Take a picture of the document with the camera on your computer. Move the documents to the MDD Document Transfer Folder on your My Data Diary+ tool. (This method is only recommended for single page documents.)
- Use a free scanning app such as GeniusScan on your phone to turn a multi-page document into a PDF file and e-mail it to yourself. Save the document in the MDD Document Transfer Folder on your My Data Diary+ tool.
If the document you are scanning is highly sensitive or confidential, we recommend using a local scanner connected to your computer so you can avoid transmitting information over the internet.
How do I upload a document into the tool?
As you enter information in the tool, you will be prompted to add documents that are related to the information that you are entering. You can add multiple documents in any section and will have the ability to print and view them when you return to the section or create a custom report.
To upload a document into the database, temporarily move the document into the “MDD Document Transfer” folder on the My Data Diary+ USB storage device. Upload documents into the tool by clicking on “Attache Document(s)” and following the prompts to select the document(s) that you have moved into the “MDD Document Transfer” folder. Name the uploaded file(s) something that will help you easily identify it later.
Why do some document buttons have a red exclamation point?
Document buttons designated with a red exclamation point signal that the specified document(s) will likely be needed in the future to manage personal business or transactions. It is highly recommended that you upload these documents into the tool for easy access when needed in the future.
How do I delete a document?
You can delete documents from your database at any time by selecting “Delete” in the document viewer window. You will be asked to confirm the action because documents that are deleted from the database are permanently discarded and cannot be recovered.
How do I restore a deleted document?
It is not possible to restore a document that you have previously deleted. You will need to re-upload any documents you deleted.
Are the documents that I upload into the tool secure?
Once a document has been added to the database, it is encrypted and can only be accessed once you have entered your password or recovery questions.
Where are the files that I saved in the “MDD Document Transfer” folder?
The “MDD Document Transfer” folder is a temporary folder for use during a single data entry session. The documents in this folder are not password protected or secure. Therefore, for your protection, all documents saved in the MDD Document Transfer folder are deleted when you close the tool.
How do I view a document that is saved in the My Data Diary+ tool?
You can preview documents that you have uploaded into the tool if they have been saved with an image filetype (ie .jpg, .png, .pdf). Navigate to the section where the document is saved. Click on the button where the documents are stored. Select “View”.
Documents with non-image file-types (ie .xls, .doc, .ppt) cannot be previewed in the tool but can be downloaded to your MDD Document Transfer folder and viewed from there.
You can find a list of all documents that have been uploaded into the tool on the Document Library page of the Printing & Sharing section. You can preview image filetype documents from this location, as well.
How do I print a document that is saved in the My Data Diary+ tool?
To print a document that you have uploaded into the tool, you need to create a custom report by going to the Customer Reports page of the Printing & Sharing section off the tool. Click on the section of the tool where the document is uploaded and select “Show Documents”. Confirm that the documents you want are displayed and print the report.
You can also download an individual document to the MDD Document Transfer folder or another location on your printer and print the individual document from there.
How do I download a copy of a document that is saved in the My Data Diary+ tool?
You can easily download any document that you have saved in the My Data Diary+ it from the database whenever you might need it.
- Find the document you need in the tool.
- Click Download.
- Watch for the “Success” message in the green box in the upper right corner of the tool.
- Go to the MDD Document Transfer Folder on your My Data Diary+ tool to find the downloaded document that you need.
- Print the downloaded document or save / move the document to another location on your computer.
Note: The Document Transfer Folder on your My Data Diary+ USB device is a temporary folder because it is NOT secure or encrypted. It is recommended that you delete documents from that folder immediately after transfer. For your protection, all documents in the “MDD Document Transfer” folder are deleted when you close the tool.
What Operating System(s) will the Tool Work in?
Your My Data Diary+ tool can be opened by both Windows and Mac operating systems. The tool is compatible with the below Windows and Mac versions. A ‘+’ indicates the minimum supported version.
What do I do if I get a warning message from my Anti-Virus Software?
Anti-virus software installed on your computer might interfere with the installation of the My Data Diary+ software. To successfully load the software, you may need to disable your virus protection program or mark the software as safe. If your virus protection program quarantines or disables the My Data Diary+ software, you will need to contact the My Data Diary team for support at support@mycarecompanions.com.
Where Should I Store my My Data Diary+ USB drive?
The My Data Diary+ tool is designed to be mobile and secure so that you have your important information and documents with you wherever and whenever you need them. The tool is provided to you on a USB drive that can be attached to your keyring so you can have your information with you at all times.
How do I close the tool?
The standard Windows close “x” in the upper right corner of your screen is disabled to enable the auto-save capability in the tool. To close the tool, use the large “X” next to the Key Word Search in the top right corner of your tool. Clicking this large “X” inside the tool will ensure that all of your database changes have been saved.
It is recommended that you safely “Eject” your My Data Diary+ USB drive from your computer using the standard method for your computer. For Windows PCs, there are several methods available for you to safely remove your device:
- Right-click on the My Data Diary+ device in the File Explorer window and select “Eject” or
- Click on the USB icon in the lower right corner of your computer and Click on “Safely Remove Hardware and Eject Media”.
Can I Copy and Paste content from another program or from one area of the tool to another?
“Cut”, “Copy” and “Paste” functions are available in the “Edit” Menu just above the MDD icon at the top of the tool.
Can I make the content on my screen bigger or smaller?
To display less content and make the text bigger or to display more content and make the text smaller, use the “Zoom In” and “Zoom Out” functions in the “View” menu just above the MDD icon at the top of the tool.
What do I do if the tool becomes unresponsive?
Why doesn’t my tool work after my computer goes to sleep?
If your computer goes to sleep while the tool is open, the USB drive will be put to sleep, and you will need to close the tool and reopen it to continue your use of the tool.
How do I disable USB sleep mode on my computer?
- From the File Explorer, Right Click on My Computer or This PC and select Properties.
- Click on Device Manager.
- Expand Universal Serial Bus controllers.
- Right-click on USB Root Hub device(s).
- Click the Power Management tab.
- Uncheck the Allow the computer to turn off this device to save power check box.
- Collapse Universal Serial Bus controllers.
- Close the Device Manager with the “X” in the right corner.
- Close the Control Panel / System window with the “X” in the right corner.
Should I share an electronic copy of My Data Diary+ with my care companions?
The information in your My Data Diary+ tool is designed to be shared with your care companions – the trusted family members, friends, and professionals who assist you with the management of your household and who may be called upon to assist with the management of your care and / or the settlement of your estate.
How often should I share my information with my care companions?
You will want to ensure that you provide updated information to your care companions any time you make a material change to your information. It is recommended that you update and share your updated information with your care companions at least once a year.
How should I share an electronic copy of My Data Diary+ with my care companions?
The My Data Diary+ tool is designed for you to flexibly share as much or as little of your information and documents as you prefer. The method you choose for sharing your information will depend on who you are sharing the information with and how much you are willing to share. Several options are recommended for you to share the information in your My Data Diary+ tool:
- Share the Password to your tool – Tell your care companions where they will find your My Data Diary+ tool, and provide them with the password.
- Share individual pages of the tool – Print or share specific pages of the tool without documents.
- Create custom reports – Specify the parts of the tool you wish to share with or without sensitive information and documents.
- Make and share a copy of your entire database.
Be sure you exercise care in selecting which content you will share and with whom. But, make sure that your care companions will have access to the information they need to assist you when needed.
How do I print an individual page in the tool?
You can print any page of the tool by clicking on the Printer icon in the upper right corner of the tool. To create an electronic copy of the page that you can attach to an e-mail or save to another electronic location, select a print to PDF option such as “Microsoft Print to PDF” and follow the prompts to save an electronic copy of that file to the location of your choice. Important Note: Documents will not print using this method.
The My Data Diary+ custom reporting page provides you with the ultimate flexibility to select the content you want to print and / or share with your care companions:
- Go to the Printing & Sharing in the left navigation bar.
- Select Custom Reports.
- Select the Profile (person) for which you wish to create the report.
- Select one or more sections you want to include in your report.
- Customize your output:
- By default, only the fields you have populated will show in the report. To show blank fields for the sections you have selected, click on the “Show Blank Fields” button.
- By default, the report will not show fields designated as “sensitive data” (i.e. Social Security number). To show sensitive data, click the “Show sensitive data” button.
- By default, documents are not included in the report. To show documents that have been uploaded for the sections you have selected, click on the “Show documents” button.
- Click on the printer icon in the upper right corner of the tool.
- To print a physical copy of the report you have created, select the printer you want to use and click print.
- To create an electronic copy of the output report that you can attach to an e-mail or save to another electronic location, select a print to PDF option such as “Microsoft Print to PDF” and follow the prompts to save an electronic copy of that file to the location of your choice. Please remember that the PDF output files you create are not encrypted or protected in any way. It is not recommended to send unprotected files by standard email if they contain any information that you wish to keep confidential or secure.
How do I make a copy of my entire database to share with a care companion?
There are two options available for you to create a copy of your entire database to share with a care companion:
- To create a fully functional copy of the database, click on the Database Backup page in the Settings section of the tool and click Create Backup Database. Specify the folder where you want to save the Backup Files.
- To create a Read-only version of the database, click on the Database Backup page in the Settings section of the tool and use the “Create Read-Only Database” option to create an un-editable copy of your database to share with your care companions. Specify a personal file name for your backup database. Specify a password for this read-only copy.
Share the backup files you created with your care companion. They can open these files from their computer by downloading the trial version of the My Data Diary+® software from our website, opening the software, selecting “Click here to open an existing database”, and selecting the location where they saved the copy of the database you provided.
Who should I choose as the Administrator of the tool?
Any profile can be set as the tool Administrator. The Administrator is usually either the head of the household or the person who will be primarily responsible for data entry and data management in the tool.
Why do I need to designate an Administrator?
An Administrator is required in order to establish relationships with other members of the household.
Can there be more than one tool Administrator?
Only one person can be designated as the tool administrator because the designation is used to establish relationships with other members of the household.
Can I change the tool Administrator once it has been set?
Yes. To change the Administrator of the tool, first change the Administrator status of the current Administrator to “No”, and then change the Administrator status of the new Administrator to “Yes”. Be sure to update the “Relationship to Administrator” status on the Profile page of the Personal Information section for each profile to reflect the correct relationship to the new administrator.
Do you have to be an Administrator to enter and manage data in the My Data Diary+ tool?
No. You do not have to be an Administrator to enter or manage data in the tool. Anyone who uses the password to access the tool will be able to add, delete, update, or change the information in the tool.
How many profiles can I create?
The My Data Diary+ tool is designed to capture information and documents for one household and all of the individuals living in that household. You should create a profile for each individual living in your household. Individuals living separately and/or maintaining independent finances should purchase and use their own copy of the My Data Diary+ tool?
Can I hide a profile for a member of my family who passed away?
Yes. You can archive an entire profile by going to Profile Management in the Administration section. Select the red “Archive” option on the right corner of the record. When you click “Archive” you will be asked to confirm your desire to archive the record. Archiving a record will hide the record from your standard view but will allow you to restore the record and/or access the information in the record in the future.
How secure is the tool?
The My Data Diary+ tool uses SQLCipher 256-bit AES encryption to secure the information in your SQLite database file. All of the information in your My Data Diary+ tool is protected with a password that you create.
Please remember that you are responsible for the security of all information and documents stored on the My Data Diary+ tool. My Data Diary, LLC accepts no responsibility for lost or stolen data.
What is the password?
Your My Data Diary+ tool arrives with “Password” set as the factory password. When you first launch the tool, you will be prompted to change the password on your tool.
How should I pick my password?
Can I change my password?
You can modify your password and security questions at any time in the Security page of the Administration section of the tool.
What do I do if I forgot my password?
When you set your password, you are also given the option to select three customized recovery questions and answers. If you forget your password, you can click on “Forgot your password?” to answer the three security questions to access your tool. To access the tool without the password, you will need to answer all three questions correctly. Answers to the recovery questions are case sensitive. Once you have gained access to the tool using your security questions, you will be able to reset your password.